Installation and launch of Node.js on the Smarthost.eu hosting account

How to Install and use Node.js on Smarthost Server Smarthost   SSH access is required to use Node.js. Access can be enabled via the Customer Area https://www.smarthost.eu/panel/login or all hosting accounts, except for the base-micro package. Click the magnifying glass icon next to the service, and then the Enable SSH button. The package cannot be in the trial version (must be paid for).  

Installation of Nodejs

1. We connect to SSH using the port specified in the client panel. We can use Putty for this purpose.

2. We enter

cd

and press enter

3. We select the Nodejs version we are interested in from the https://nodejs.org/dist repository.
For the purposes of this guide, nodejs v21 will be used.

4. Now we need to download the selected version of nodejs through the terminal using the command:

wget https://nodejs.org/dist/latest-v21.x/node-v21.1.0-linux-x64.tar.xz

5. Then unpack the downloaded package:

tar -xJf node-v21.1.0-linux-x64.tar.xz

6. We can change the name of the extracted directory to a more friendly one with the command:

mv node-v21.1.0-linux-x64 nodejs

7. We create a bin directory in our own home directory

mkdir bin

8. Copy the Node application there:

cp ./nodejs/bin/node ./bin

9. We enter the bin directory:

cd ./bin

10. We create a symbolic link:

ln -s ../nodejs/lib/node_modules/npm/bin/npm-cli.js npm

11. Node and npm are installed, we can type:

node –version

It should show:

v21.1.0

And for the command:

npm –version

Appears:

10.2.0

The node and npm commands will work from any directory by being placed in the bin directory.

Launching the application

First, you need to place your nodejs application in any directory on your hosting.

We go to the directory where we put the application and then enter:

nohup node aplikacja.js &

With & the app will run in the background, while nohup will keep the app running after logging out.  

Alternatively:

  1. Type the command screen and confirm with enter
  2. We run our application node application.js
  3. Press ctrl a
  4. Then press d
  5. Our screen will go to work in the background
  6. You can get back to it with the command screen -x

Disabling the application

Enter:

pkill node

and we press enter.

Alternatively:

  1. We return to screen with screen -x
  2. We close our application with process.exit()
  3. We can close the screen with the exit exit command

Redirection to the Node.js application to the selected domain

We place the following rules in the .htaccess file (this file is created in the domain directory, e.g. public_html/client-domain.eu): :

DirectoryIndex disabled
RewriteEngine On
RewriteRule ^$ http://127.0.0.1:PORT/ [P,L]
RewriteCond %{REQUEST_FILENAME} !-f
RewriteCond %{REQUEST_FILENAME} !-d
RewriteRule ^(.*)$ http://127.0.0.1:PORT/$1 [P,L]

Instead of PORT, enter a number from the range 49152 to 65534. If the port is occupied by another Client, we select another one until the application will work on it. You should also remember to set the same port in the Node.js application.

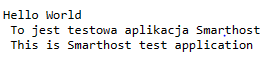
All you have to do now is enter our domain and you will see a page served by Node.js.

Redirect to secure https connection with SSL cPanel

We can also redirect traffic with the server to a secure https connection. Attention! We run the Node.js server as http, not https. The https connection is provided by our Apache server. The cPanel certificate is generated automatically after adding a domain via Additional Domains in cPanel, so you don’t have to worry about installing and configuring an SSL certificate.

Use the following contents of the .htaccess file to force redirection (changing PORT to a number in the range given above):

DirectoryIndex disabled
RewriteEngine On
RewriteCond %{HTTPS} on
RewriteRule ^$ http://127.0.0.1:PORT/ [P,L]
RewriteCond %{HTTPS} on
RewriteCond %{REQUEST_FILENAME} !-f
RewriteCond %{REQUEST_FILENAME} !-d
RewriteRule ^(.*)$ http://127.0.0.1:PORT/$1 [P,L]
RewriteCond %{HTTPS} !=on
RewriteCond %{REQUEST_URI} !^/[0-9]+\..+\.cpaneldcv$
RewriteCond %{REQUEST_URI} !^/[A-F0-9]{32}\.txt(?:\ Comodo\ DCV)?$
RewriteCond %{REQUEST_URI} !^/\.well-known/acme-challenge/[0-9a-zA-Z_-]+$
RewriteCond %{REQUEST_URI} !^/\.well-known/pki-validation/[A-F0-9]{32}\.txt(?:\ Comodo\ DCV)?$
RewriteRule ^ https://%{HTTP_HOST}%{REQUEST_URI} [L,R=301]

WebSocket support

For the ws:// protocol to work properly, you need to create rules in .htaccess, for example, for the socket.io library, add the following lines under the “RewriteEngine On” line (changing the PORT to the previously selected number):

RewriteCond %{REQUEST_URI} ^/socket.io [NC]
RewriteCond %{QUERY_STRING} transport=websocket [NC]
RewriteRule /(.*) ws://localhost:PORT/$1 [P,L]

Running Node.js from cPanel

We recommend running Node.js applications from cPanel. More information on this can be found in our blog post: https://www.smarthost.eu/blog/how-to-run-node-js-in-cpanel

Create a free test account on the Smarthost.eu server and check how Node.js works.

Create a test hosting account with Node.js support

Michał Kryczka

Leave a Reply